Summertime... and when the weather is nice, I like to be outdoors enjoying it! We certainly had a lot of great weather during July and I played a lot of golf. I keep practicing, eternally optimistic that some day it will all come together in the perfect game.
But I also have been doing some more creative stuff which does eventually reward me with a finished product that I can share with you.
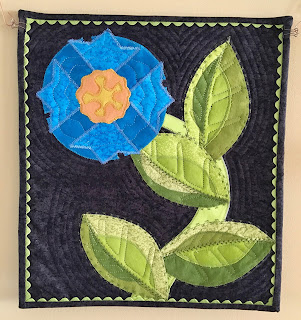
In June I took a workshop with Jane Sassaman learning an appliqué technique she uses on some of her quilted art. It involves fusing fabric onto interfacing, drawing your shapes on the interfacing and then cutting them out. Then you have shapes you can arrange to your liking on your chosen background. Once you've developed your design, then you use decorative stitches to attach the pieces, raw edge, to the backing. As you complete each layer, you cut away the extra fabric behind, so the piece stays supple.
I used the technique to make a 6 1/2 inch "president's block" for our last year's AQG president who requested hearts on a white background. Looking at the back of this simple block you can see that two layers of the red fabric centers were cut out.
For my class project, I brought this photo of a blue poppy that I took at Butchart Gardens in June.
And came up with this final product which I will bring to the AQG meeting this coming week and donate to the small quilt silent auction at our quilt show. (Proceeds from this silent auction support our guild's community quilt program.)
It was a fun workshop, but to be honest, I'm not thrilled with the technique. I've come to accept and enjoy raw edge fused appliqué, but the fusible interfacing does not seal the edges as well as fusible web, so in my mind, no amount of decorative thread stitching really captures all those frayed edges to my liking.
One of the hand sewing projects I have been enjoying this spring involves sewing coordinated fabrics into strips which I then finish into blocks with my sewing machine. Starting with three charm squares (5 inch squares) which I've cut in quarters and a coordinating solid center 2 1/2 inch square, I make up packets so that I can hand sew the three square strips and the five square strips. Sometimes I hand sew the white triangles on the end, too. But then I machine sew the strips together and add the corner white triangles, since they then need to be cut down a little to measure 8 inches square.
The blocks are fun to make, use up a lot of scraps, and are very easy to transport so I can sew while being a passenger on a road trip, in a hotel room, at my kid's homes, at outdoor concerts, a bee... where ever.
So, I recently finished my first quilt made with these blocks. I arrange each block into what looks most pleasing to me that day and it surprised me when I put them together how the different values make the blocks look different. Some look like "X" and others like lines of diamonds and others you can clearly see the central 9 patch. I think that gives this scrappy quilt top a bit of interest.
I had some coordinated tealish aqua fabrics in my stash that I used for a pieced backing and binding.
I like to "stage" quilt photos over my living room couch.
The couch gets little use, so until I decide where this quilt will ultimately end up, I will enjoy seeing it displayed on my couch. Maybe when my grandkids visit this week, one of them will claim it.
You might remember from an earlier post that my friend Alice and I made "Turning Twenty" quilt tops at our spring retreat from fabric that was gifted to us. This was actually a "Mountain Jam Circle" collaborative project, so the quilt tops went to our friend Cheryl's to be quilted after Alice scrapped together some beautiful backings. A couple weeks ago, I got one of the quilts returned to me so that I could sew on the binding. Ta Da! It's done. Here it is on my couch. Isn't it pretty?
And here is a close up showing some of the fabrics and the nice all over quilt pattern Cheryl chose.
I didn't actually measure it, but I think it's about 70 x 80. Our hope is that it will go to our local Hospice facility, along with it's partner quilt, to give comfort to someone in need.
And finally...
My friend Sue and I went to a fun event at Blue Ghost Brewery a couple of weeks ago. I think it was called "Blooms and Brews." The event was run by two young women, one was the "flower expert" and the other was the "painting expert." We were given a canvas and a variety of paint materials and some direction for painting the background of our masterpiece. We put those aside to dry.
Then we were given some suggestions for composing flower arrangements and we were let loose to choose our focal flowers, secondary flowers and greenery fill ins from a lovely selection of flowers that were brought in from a local flower farm.
Here is my arrangement which was then used as inspiration for finishing my painting.
And here is my interpretation!
It was a very enjoyable evening!
And it's been a delightful summer!


