Last May I took Laura Wasilowski's "Zen Doodling" workshop through the Asheville Quilt Guild. Laura is the co-founder of the Chicago School of Fusing and she is a prolific blogger. You can visit her blog at Artfabrik.com if you want to purchase any of her hand-dyed fabrics or thread, or just see images of her work.
Laura uses bright colors and fanciful images in her wall art. Though there may be some actual quilting, especially in the backgrounds of her pieces, she relies on raw edge fusing to hold things together and then embellishes, usually with equally bright colored floss that she has hand dyed.
At the workshop, we used Laura's fabrics and got a sample of her threads to bring home to finish the piece. Here's my completed wall hanging, measuring about 15 inches square.
The design was based a series of doodles I did in class. Though the fabrics were fun to work with, the color scheme and the design are not really to my liking. I did add some leaves to make it look a bit more organic. And the colors ARE brilliant!
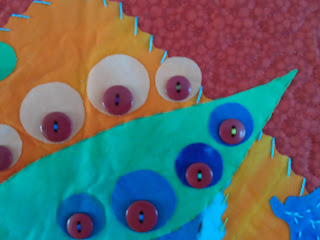
Here are some details:
I find that when I take workshops, I need to remind myself that I am there to explore a technique and that I often will not be happy with my first attempt, but it gives me a few more tools to use on future projects. And so when I got home, I did complete this project. I enjoyed the embroidery and then just happened to have some coordinating buttons, which I think add to the piece.
So, now that it is done, I will likely hang it in my sewing room for a while as a reminder of the workshop. But it's really not something that suits my taste.
Recently, the framed print on our hotel room wall (no kidding... you never know when inspiration will hit) appealed to me and I thought I could create something similar using Laura's techniques. It was more linear and organic, with hints of leaves, and tones that evoked my home's decor.
So I gathered my fabrics and this is what I came up with:
It's 18 inches square, and yes it really is square. Right now it's just hanging from a piece of furniture by a binder clip, but it's pretty true to square.
Here are some details:
The front was fused to batting, then I did the embroideries. I finished the edges by folding them over and fusing a piece of fabric on the back to hide all the thread ends.
Though the fuse is lightweight, it does add a bit of stiffness to the piece and if hung like this (well, right side forward) it would lie flat.
So, after looking at this hanging from my antique cupboard for a few days, I've decided that maybe it needs a little more embellishment, especially on the left side. So I am auditioning some beads or buttons to add. I know, I already backed the piece, so threads will show unless I'm really careful to hide them. But the piece will be framed, so the back will never be seen... or if I am really bothered, I can just fuse another square of fabric over them and hide them. (One of the really nice things about Laura's technique is that you can hide just about any mistake with some kind of fused "extra.")
So, back to work on it some more. And then I will have to do the framing. A bit of luck bought me this frame at an estate sale this weekend and I think it will be perfect.
The frame has a few nicks and dings, but it's basically fine and came with glass and two mats, so I will have some options. I'll try to remember to do another posting when the piece is finished, matted and framed!
To be continued...


It's interesting to e that when Laura posts pictures of student work in her workshops, the pieces look like she might have made them herself. Your second piece proves the point you make though - you learned techniques to apply elsewhere, which you have done to great effect!
ReplyDelete